I found this recipe via Pinterest. I decided to try it and give it my own spin!
the Recipe calls for the following:
- Bag of frozen Chicken Breast Tenderloins (2.5-3lb bag)
- 8 oz block of cream cheese (don't use Fat Free! 1/3 less fat or regular is fine)
- Can of Black Beans, drained & rinsed. (or Pinto Beans if you prefer)
- Can of Corn, drained.
- Can of Rotel
Differences in mine:
I used two Large frozen breasts, 1/3 less fat cream cheese, and half jar Hot Salsa (I didn't have any Rotel). But otherwise I used the black beans and the corn.
Directions:
Put frozen chicken in the crock pot.
Put Cream cheese on top of the chicken.
Dump in the Black Beans (make sure they are drained & rinsed!!!)
Dump in the drained corn.
Dump in the Salsa.
Cover & cook in your Crock Pot on low for 6-8 hours.
I stirred it after 5 hours
You can shred the chicken when it is done, or just leave it as is.
This is what it looks like after 6 hours (shredded):
I served it on a 100% whole wheat tortilla with Cheese and spanish rice. Hubby loved it! I took photos, but must find them!
Sunday, October 28, 2012
Thursday, October 25, 2012
Niffty, Niffty, organizing my office...
My office is a disaster. Plain and simple. It always looks as if Hurricane Holly ripped through (yep, that's me!) I hate my office to look cluttered. Running a home business where I bring in clients and having them see my super messy office is embarrassing.
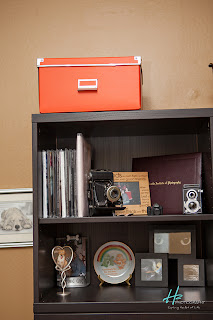
1. I HATE how ugly my router and modem are in my office. All those cords hanging around and looking mixed up. I had seen this, so, I had an idea, why not hide them too! I have had these orange Kassett boxes from Ikea for years and just never got around to putting stuff in them. So here is what I did. (sorry, I forgot to take step-by-step photos).
First up I took my handy dandy box cutter and cut two square holes out of the back of the box, and another square hole on the bottom of the box, so the modem sits on the dresser, not on the cardboard box. I also cut the entire top off the box, since you can't see it anyway. Having those extra holes is a MUST for ventilation. I figured out the best way to do the cords and wrapped them all up inside the box, even my super long Ethernet cord! Then I threw on the box lid. So far, my husband, whose computer is upstairs on the other side of the house hasn't said anything about his wireless connection being slower. SO I think we shall keep it like this! It makes the top of my shelf look a ton better and now I can add other boxes to the top of my shelf so it doesn't look so alone and out of place!


2. I also decided I have these USB cords on the front of my desk that always fall down and try to get sucked into the vacuum! Well, not anymore! I used those big black binder clips on the keyboard drawer of my other desk to keep them off the ground! Just pull them through to connect to the computer! Super simple and pretty much free since Ive had those clips for years! They were just collecting dust in my drawer.

Wednesday, October 10, 2012
Fun with Rocks
I found this craft via Pinterest. Rocks So I thought I'd try it. We did it prior to the new information about NOT putting rocks in the oven.
I put two rocks in our oven on the warm setting. I don't know how hot it gets, but it was enough to warm the rocks, so the crayons would melt. It was fun while it lasted and he wanted to do more rocks until... He touched a rock. I did it with our 3.5 year old, I don't know how many times I said "You Cannot touch the rocks" He'd repeat, "No touching the rocks, I know Momma" What does he do? Touches the rock. We had a little blister, he's fine, but didn't want to do anymore after that.


Saturday, August 25, 2012
Tater Tot Casserole

1 package ground beef or turkey (about 1.5 pounds) season if you want , we use ground black pepper.
1 can green beans
1 can whole kernel corn
1 can cream of mushroom soup
1 cup shredded cheese (whatever is in the fridge..which for us, is usually Colby Jack)
1/2 cup French's french fried onions (original or cheddar flavor)
Tater tots
Cook meat and drain.
In a bowl mix meat, green beans, corn, cream of mushroom soup, french fried onions, and 1/2 cup shredded cheese. Spread evenly in a greased 8x8 pan.
Sprinkle remainder of cheese evenly over the top.
Cover entire casserole with tater tots.
Cook according to tater tot instructions.

 My family likes a lot of tots, so sometimes I do duel layers. It just depends on how many I have!
1 can whole kernel corn
1 can cream of mushroom soup
1 cup shredded cheese (whatever is in the fridge..which for us, is usually Colby Jack)
1/2 cup French's french fried onions (original or cheddar flavor)
Tater tots
Cook meat and drain.
In a bowl mix meat, green beans, corn, cream of mushroom soup, french fried onions, and 1/2 cup shredded cheese. Spread evenly in a greased 8x8 pan.
Sprinkle remainder of cheese evenly over the top.
Cover entire casserole with tater tots.
Cook according to tater tot instructions.


Wednesday, August 22, 2012
The many uses of Vinegar!

Vinegar. We use a vinegar. Everything from an all-purpose cleaner, to a substitute for Jet Dry, to use in the laundry. And since I like to use my spray bottle A LOT, it means we go through a fair amount of vinegar. Costco has Heinz Vinegar for $3.76 for a 1.32 gallon jug - and that price makes it much cheaper than store-brand name vinegar. But I'm sure you want to know all of the uses for this amazing liquid! One thing I will tell you. DO NOT USE VINEGAR ON GRANITE, or any other type of natural stone including marble, travertine etc!!! Ok, now that I've said it, I'm sure you're wondering why. Vinegar is a weak acid. The acid interacts with the granite and turns it dull. Over time, the vinegar will etch the surface of the granite, allowing stains to penetrate the rock.
My husband hates it when I clean with vinegar, he says the house smells like a salad. But the vapors do evaporate shortly after it has dried. Best yet, I can clean and not have an asthma attack. So go to the Dollar Store and buy a ton of spray bottles and enjoy cleaning the way I clean my house!
All-purpose cleaner: 2 parts vinegar, 1 part water.
Steam Mop: Every once in a while, I add 1 part vinegar to my steam mop. Helps to clean out the mop incase of any mineral buildup.
Dishwasher: There are many ways to use vinegar in the dishwasher! My favorite being in place of the spot free rinse! It says in the manual of most dishwashers not to use vinegar every time, but I've been using it in place of that expensive blue spot remover for over 5 years and never had any problems.
Also, instead of buying the dishwasher cleaner, just run your dishwasher with a dishwasher-safe cup filled with plain white vinegar on the top rack of the dishwasher. Using the hottest water available, run the dishwasher through a cycle – except for the cup of vinegar, the dishwasher needs to be empty. After using the vinegar to sanitize the inside of the dishwasher, sprinkle a cupful of baking soda around the bottom of the tub and run it through a short but complete cycle using the hottest water. The baking soda will help freshen the smell of the dishwasher as well as brighten up the look of the inside of your appliance by removing stains. **Remember: Do NOT run the baking soda and the vinegar at the same time, it will cause a bubble explosion and you will have a mess.
Pee stains on carpet (presumably from pets): Blot up the initial stain, flush it with water, then apply equal parts vinegar and cool water. Blot it all up, rinse, and let dry. This will eliminate odors and stains.
Hard water stains and mineral deposits: Allow a cloth soaked in vinegar to sit on a hard water stain (for example behind your faucet) or mineral deposit for a few hours. Wipe clean. Or fill a baggie with vinegar and rubber band to your shower head, soak for a few hours, wipe clean then the hard water will be gone!
Appliance cleaning: Clean your coffee maker or laundry machine by running vinegar through it, followed by water. This reduces soap buildup and keeps everything in working order.
Remove labels from glass jars: Saturate the labeled area in vinegar and scrape the stickiness right off.
Dirty pot bottoms and cooking utensils: Fill the pot with enough water to cover the stain, add 1 cup of vinegar, and boil rapidly for 5 minutes. Let cool, then scrub the stains off. While you're at it, put your stainless steel cooking utensils in the pot to get them sparkly clean too.
Coffee stains on china: Use a mixture of salt and vinegar to clean coffee stains from china.
Fruit/Veggie maintenance: http://notsogross.blogspot.com/2012/06/raspberries-are-my-favorite.html
Cutting boards: Wooden cutting boards are great, except they can be a hothouse for bacteria (especially if grooves have been cut into the board with use). Disinfect it regularly with vinegar to keep it (and your food) clean.
Kill grass and weeds: Pour or spray full strength vinegar on grass or weeds poking through your driveway or rearing their heads in other unsavory places.
Kill soap scum: Wiping a scummy area with vinegar and rinsing with water will do as good a job as any at attacking your bathroom shower grime. If the scum is particularly stubborn, scrub with baking soda (a great natural abrasive) after wiping with vinegar. Rinse with water.
Hair rinse: vinegar neutralizes the alkali left by shampoos.
Cloth Diapers/All Laundry: add a cup of vinegar during the rinse cycle, it will help balance the pH and remove any buildup.
Easter Eggs: Add 1 tsp of vinegar (for every 1 cup - ish of water. Adding vinegar to your easter egg colors will make colors brighter.
I can go on and on about the uses of vinegar, and maybe I'll continue this post at a later date
Who knew that vinegar could do so much? It serves a purpose in just about every room of the house, and there are dozens of household products that vinegar can replace. It's cheaper, better for the environment, and better for your health and home (in eliminating unnecessary chemicals).
Tuesday, August 21, 2012
Masterpieces at Bath Time...a failure
Trying to find things for my 3 year old to do while I'm stuck on bed rest is always a challenge. He is one of those strange little boys that doesn't like to get his hands dirty. But today, Grandma offered to give him a bath, so I thought we'd try the homemade bath paints. That way he can get dirty, but instantly get clean again! Using ingredients I have in the house we made only two colors today, blue and yellow. Good thing we did, the original recipe called for what is listed below....
What you need:
1T cornstarch
1/8c. Baby shampoo
2-3 drops food color
1T water
Using this as my guideline, the paint was WAY too runny. It didn't even paint the wall! So we added 1T more of the cornstarch & it still wasn't thick enough. We ended up with 3T of cornstarch, which made it better, but what I am thinking for next time is omitting the water, and adding an equivalent amount of baby shampoo to the cornstarch. It was just too runny. The most fun of his bath was he loved making green and having his water turn green in the process. He had fun, even though he wasn't able to "paint" the tub.
I'll repost once we figure out a good balance. I've seen the colored shaving cream paint too, but since shaving cream is rather expensive and we don't use it in our house, it's pointless for us to buy any.

You can see the yellow "paint" on the wall, but the blue was just too runny.

Sunday, August 12, 2012
Spaghetti Sauce
I'm a sucker for Spaghetti. My mom has alway's made a mean sauce. She doesn''t really work off a recipe, but I asked for one and she gave me the basics. She still likes her's with ground beef, I prefer ground turkey. The turkey does give it a bit of a different taste, but it doesn't bother me.
What you need:
1 LB Ground Beef
1 Large Can Tomato Sauce
1 packet of spaghetti seasoning
1 tsp salt
1 tsp pepper
2 tsp onion powder or onion salt
Brown beef in pan until no pink, drain. Add Salt, pepper, onion powder, tomato sauce & Packet seasoning. Simmer 30 minutes.
I think it's best the next day, but that's just me!

Thursday, August 2, 2012
Everyone loves Goulash!!

To serve 6
1 lb-or a bit more ground beef
1/4 cup chopped onion
1/4 cup chopped green pepper or mushrooms or both
Salt and pepper to taste
1 large can tomato sauce, sometimes if I use too much macaroni, I need another medium can or medium can diced tomato
Elbow macaroni-use amount suggested on package for the number of servings you want - cook before adding
Brown the beef and the onion- seasoned with s/p
Add tomato sauce and green pepper
Add cooked macaroni-if you plan to bake it only cook macaroni about half of the time suggested
Either continue to cook on stove until ready to serve or freeze foe later.
If you plan to bake it, bake 350 degrees for about 30-45 minutes or until baked down. If you do this, be sure not to cook it dry or you will have to add more tomato sauce.
Wednesday, July 25, 2012
Awesome Slow Cooker Pot Roast!!
This is a very easy recipe for a delicious pot roast. It makes its own gravy. It's designed especially for the working person who does not have time to cook all day, but it tastes like you did. It got rave reviews from the peanut gallery, which consisted of my Husband, my Mother, and even my 3-year old enjoyed the carrots, potatoes & sauce (just not the meat). Can't win them all!
I'm not too picky with my meat, I usually buy whatever I can find cheapest, tonight it was a 2.5 lb Top round roast. It had very little fat and was the perfect meat! I will put down what my recipe, but using only 2.5 lbs of meat, you could cut it down to 1 can of mushroom soup and less water. The gravy was really good, but I'd have liked it to be thicker.
What you need:
Crock pot
2.5 lbs meat
salt & pepper

1/2 onion
2 (10.75 ounce) cans condensed cream of mushroom soup
1 (1 ounce) package dry onion soup mix
1 1/4 cups water
2 (10.75 ounce) cans condensed cream of mushroom soup
1 (1 ounce) package dry onion soup mix
1 1/4 cups water
Russet Potatoes (we used 5 & peeled & cut them in half)
1 - bag Mini Carrots
Directions:
1. salt & pepper meat to taste
2. in a slow cooker, mix cream of mushroom soup, dry onion soup mix and water. Place pot roast in slow cooker and coat with soup mixture.
3. Cut onion & throw in (we quartered the onion)
4. Cook on High for 5 hours
5. Add potatoes and mini carrots
6. Cook another 3 hours on low
It was a divine meal! The meat was super tender and the gravy was very flavorful.

Tuesday, July 24, 2012
Race Car Birthday
For my sons 3rd birthday, he'd been telling me he wanted a race car Birthday. I came up with this as the invite and knew I wanted to try to theme the entire party around race cars. This is really the first time I've ever thrown a theme party before. Guess I'd better get used to it now!

I had thought long and hard about how in the world I could do a fun race car cake. I didn't want to do just a race car, but, I'd seen on google a few track cakes and I loved them. But I am NOT a cake maker! I called around and got some estimates on cake, all of which were way too high to spend on a 3 year olds cake, IMO. So I thought, maybe I can do this. I've tried to make a double layer sheet cake in the past, it was a disaster, so I had our local grocery store make me a chocolate sheet cake with no frosting. I'm sure they've had stranger requests.


I had found at the store something new Duncan Hines Amazing Glazes, just microwave and pour onto your favorite dessert. From the photo on the bottle, it looked like it would be the perfect smooth surface for my road. Because I knew I didn't want to deal with fondant, I don't like the taste, and black fondant with 3 year olds would be MESSY!! I poured on the Glaze, let it sit up and free-handed my 3. I didn't glaze the entire cake, only where I wanted my road to be.

Next up was the daunting task of grass. I didn't want to smear on a flat green frosting, I wanted it to look like real grass. Little did I know, that this would be the longest part! I believe it took me around 2.5 hours to frost my cake with my grass. I had made homemade frosting, so it was all ready for me. I used a frosting bag with a star tip on it, to give me the grass look I wanted. The top is what took me the most time, I wanted each to be its own grass, on the sides, I did rows of grass. The sides took me no time at all. I also added the road dashes with a basic white can of frosting using a round tip. 

I let my son pick out the cars he wanted to showcase on his cake the day before. Of course, he picked some pretty cool cars! I had also made a checkered flag for the finish line and the 3 candles were red, yellow & green.


I didn't get all crazy with decorating the rest of the party, I'd had big idea's but decided it wasn't about those small details. I had made him a banner on a checkered flag ribbon and gotten orange cups (I thought they looked like cones) and our plates were yellow, green, and red. Plus, who doesn't love balloons!


Waiting to blow out his candles.

For thank you gifts, I decided on some crayon caddies from Two Little Monkies with a Matchbox car in the band on the outside (I didn't photograph them, sorry, but here are the Caddies from her site) & I made a thank-you note to thread through the band as well.

My son loved the party, and while it wasn't the full out theme party I had originally thought about, it was just perfect for us!
Monday, July 23, 2012
Cranberry Chicken - My #1 Favorite
I do not like cranberries, I do not like jellied cranberry on my turkey at Thanksgiving, but I absolutely LOVE cranberry chicken! The flavor is so delicious and it is probably my #1 favorite chicken meal. I think, no I know, that when my hubby and I were married the first year, it's pretty much all I made and he was so sick of it! But that's what happens when you marry someone who doesn't have much sense in cooking unless she has a recipe. I'm still that girl, but I'm getting more daring.
Here's what you will need:
Skinless Chicken breasts (I usually cook 4)
1/2 package of onion soup mix (shake to get mixed up)
1 - 14oz can of jellied cranberry
4-6 oz - French or Russian salad dressing (This will be up to you, I don't like mine so runny, I like a thicker sauce)
Preheat oven to 350 degrees
Mix: Onion Soup mix, cranberry sauce, & dressing together. Pour over washed chicken that has been patted dry with paper towels. (I know there has been tons of debate as to whether or not you should in fact wash chicken, but I'm so diligent about keeping the juices off everything) Bake for 45min-1hour.
I usually serve mine with Wild rice and Peas. I love to smother the entire dish in the extra cranberry sauce.
So I will apologize for the lack of a beautiful image, this bed rest thing makes it very difficult for my "keepers" to let me get up and photograph food. Which is making me very sad!! I'm going through a photography withdrawal. But they also aren't "styling" my food before they serve it to me.

Thursday, July 19, 2012
Lucky me!
Well Im sorry to say that I won't be posting all those Yummy Pinterest items I find to eat and make on here, nor will I probably be posting many of the crafts and projects. I've been put on bed rest for the next 8 weeks. I may need padded walls and a straight jacket sometime in the coming weeks. I'm on day 3 and I'm already totally bored. Pinterest is keeping me pretty busy, but I'm so sad I can't do DOING most of what I find on there. I will be updating the Baby Blog now. Because thats what 99.9% of my day is about now.
Thursday, July 5, 2012
Fun for Hours!
If you have a 3-year old and you live in the desert, you know as well as I do the most asked question when it is a blazing 108+ degrees is "Can we go outside?" Let me think about that for a second, "Um, no, we cannot!" So this being said, I needed to find some fun things for him to do that weren't the normal playing cars, coloring, and running around like a maniac!
So what you do is take a baking pan and fill the bottom with Baking Soda. Then take Tupperware dishes and put some vinegar and food coloring in them. Then use a dropper (I used one from an old Tylenol bottle). I showed the boy how to use the dropper, and he's been at this "project" for well over an hour. We are actually on our 2nd pan of Baking Soda.
Plus, its a good teaching lesson as well. You should know that when you drip vinegar into the baking soda, it will fizz.


"I can do this, I'm a boy" Direct quote from the boy.


Tuesday, July 3, 2012
Great way to store muffin cups!
I went to a friends house and she's all about the organization! If you're like me, I buy those darn muffin cups when I see them go on sale, or more recently, I found them for .99 at Big Lots! Woo! I never seem to have enough, and when I do, they get squished or lost in my pantry. My friend puts hers in Mason Jars, but I didn't have any of those on hand, but they fit perfectly in a salsa jar! I just peeled the label off and used Goo Gone to get the sticky off. One of these days I'll probably repaint the lid to some pretty color, but for now, it works!

Wednesday, June 27, 2012
Firecracker Chicken Pasta
I love spicy pasta! Who doesn't want to add a little spice to their life. This was pretty easy to make, the sauce was a bit harder, but I always like my cream sauce to be a little on the runny side, so 2cups of half and half just wasn't enough for me. You can also add in some grape tomatoes, but no one in my house eats those, so we omit them.

Veggies & Pasta
4 - 8 oz. Penne Pasta (I cook al dente in salt water according to pkg directions & we like less pasta)
2 tbsp. olive oil, divided
2 Boneless Skinless Chicken Breasts, cut in 1″ cubes (could also use shrimp)
¼ tsp. salt
¼ tsp. pepper
½ c. Onion, diced
2 cloves Garlic, minced
1-2 Bell Peppers, long thin slices (I use yellow, red or orange)
1 c. Broccoli florets
1 c. Asparagus, chopped in 1″ pieces
2 tbsp. olive oil, divided
2 Boneless Skinless Chicken Breasts, cut in 1″ cubes (could also use shrimp)
¼ tsp. salt
¼ tsp. pepper
½ c. Onion, diced
2 cloves Garlic, minced
1-2 Bell Peppers, long thin slices (I use yellow, red or orange)
1 c. Broccoli florets
1 c. Asparagus, chopped in 1″ pieces
Cook your pasta and let it drain.
Sprinkle the chicken breast with salt and pepper. Heat 1 tbsp. oil in a skillet over medium heat and cook chicken until done and golden on all sides. Remove and let rest in a large bowl.
Sprinkle the chicken breast with salt and pepper. Heat 1 tbsp. oil in a skillet over medium heat and cook chicken until done and golden on all sides. Remove and let rest in a large bowl.
Add the remaining olive oil and begin sauteing the onions for 2 min. Add in the garlic and bell pepper and saute another 2 mins. Then toss in any other woody veggies (broccoli, asparagus) saving the tomatoes until the very end.
When everything is cooked, combine the veggies with the chicken in your big bowl. Now its time for the sauce!
Spicy Cream Sauce
2 tbsp. butter
2 tbsp. flour
2c. half & half (I use more to make my sauce a little thinner)
1/4 tsp. of red pepper flakes
1/4 tsp. cayenne pepper
1 c. Parmesan cheese
Melt the butter over medium heat. Toss in the flour and stir, cooking 1-2 minutes.
Slowly add in the half and half while stirring to prevent any clumps from forming. Sprinkle in the red pepper flakes and allow to simmer until you see boiling action. Stir periodically.
When your sauce begins to thicken and bubble, turn off the heat and add in your cheese. Stir until melty
To assemble everything I like to add the pasta first so it gets nice and coated with sauce and then pour the rest of the goodies in.
Sprinkle cayenne pepper on top to add the firecracker flavor (you could probably add it to the cream sauce, but it is too spicy for my 3-year old so I do it after I have served him and put some aside for leftovers for him.)
Tuesday, June 26, 2012
Raspberries are my favorite
But, unless you're like me, and you buy them and gobble them in a few days, they always get moldy! My dad sent me some awesome information that totally works! There's nothing more tragic than paying $4 for raspberries, only to look in the fridge the next day and find that fuzzy mold growing on their insides. You're all going to cringe when I tell you how to do it. My husband was
like "eeewwww, they are going to taste awful!!" But, you can't even
tell!
Wash them with vinegar.
I know, I know, I know, sounds nasty, but let me tell you it really works! When you get your berries home, prepare a mixture of one part vinegar (I used apple cider vinegar, but white would probably work too) and ten parts water. Dump the berries into the mixture and swirl around. Drain, rinse if you want (though the mixture is so diluted you can't taste the vinegar,) and pop in the fridge The vinegar kills any mold spores and other bacteria that might be on the surface of the fruit, and voila! Raspberries will last a week or more, and strawberries go almost two weeks without getting moldy and soft. So go forth and stock up on those pricey little gems, knowing they'll stay fresh as long as it takes you to eat them.
You're so berry welcome!

You're so berry welcome!

Sunday, June 24, 2012
Italian Chicken in the Crockpot!
I'm all about the crock pot! Summer's here in Arizona are NOT meant for oven usage or grilling! So while everyone else is happy outside grilling, all we'd have to do is throw the food on the sidewalk to cook it. Sounds yummy right? No, which is why the crock pot is such an easy thing! It doesn't make the house hot like the oven, and you're not melting using the grill!
This was an amazingly easy meal to make! Even better was that my 3-year old tasted it! How often does that happen?

16 Ounce Bottle of Italian Dressing (I used low fat)
1/2 Cup of Parmesan Cheese
Italian Seasoning
4-6 Potatoes scrubbed cut in half or wedges (you can peel if desired)
1/2 bag of mini carrots
Spray crock with Pam
Squirt a small amount of Italian dressing at bottom of crock-pot.
Place two chicken breasts in crock.
Pour some of the Italian dressing on the chicken.
Sprinkle half of cheese onto the chicken.
Sprinkle Italian seasoning onto the chicken.
Place next two chicken breasts into crock-pot, if possible not directly on top of the first breasts.
Sprinkle remaining cheese on top of chicken.
Pour carrots on top
Pour more of the Italian dressing on top of chicken and carrots.
Sprinkle Italian seasoning onto the chicken and carrots.
Place potatoes on top.
Pour the remaining Italian dressing on the potatoes.
Sprinkle Italian seasoning on the potatoes.
Cook on low for 6-8 hours.
I apologize now for the horrible plated photograph, this is what happens when the natives are restless.

I apologize now for the horrible plated photograph, this is what happens when the natives are restless.

Thursday, June 14, 2012
Peanut Butter Chocolate Chip Cake Bars
Now that I got your attention!! Who wouldn't want to try these amazingly delicious things! Let me tell you, if you love Peanut Butter and Chocolate, then these are perfect for you! They are to die for.

Now that you're drooling over the photo, let me get you how to make these scrumptious things!
Peanut Butter Chocolate Chip Cookie Bars
(Made with any brand Cake Mix)
2 eggs
1/3-cup water
¼ cup butter or margarine, softened (not melted)
1-cup peanut butter (chunky or smooth)
1 package yellow cake mix
1 package (12 ounces) semisweet chocolate pieces
Heat oven to 375 degrees. Beat eggs, water, butter, peanut butter and half of the cake mix (dry) until smooth. Stir in remaining cake mix and the chocolate pieces. Spread dough in greased jellyroll pan (15 ½ x 10 ½ x 1 inch). Bake about 18 minutes (don’t over bake…. they are better a little gooey!) Cool and cut into bars. Can be frosted or not. Also, you can use a white or devils food cake mix AND you can substitute white chocolate chips or peanut butter chips. They are all good!
Wednesday, June 13, 2012
Do I have the time?
Who knows! But I wanted to do something like this for a while. I already run a home-based business, I'm a stay at home mom, we have a family blog, and a baby blog. Most of which have fallen into some sort of black hole and never get updated. But I knew I wanted to try to start something different. So here I am!
What's this going to be about? Well, I'm not really sure yet, but it might be all things that don't fit on any of my other blogs! I like to keep things organized, you'd never know looking at my house though.
Also, huge thanks to my friend Mysti, for coming up with a great name for the blog!
You can check out our other blogs below! But like I said, they haven't been kept up to date!
H2 Photography | Professional Family & Child Photography
It's a Little Gross
The Gross Family
Subscribe to:
Posts (Atom)